Event Tracking
How to Track Events
To start tracking events in your project, first add the Strivr.SDK namespace to your script(s)
using Strivr.SDK;To track an event, call the TrackEvent method:
StrivrAnalytics.TrackEvent("Example Event Name").End();The argument for the TrackEvent method is a string that represents the name of the event. Event names must be non-empty strings between 1-64 characters, and must contain only alphanumeric characters (a-zA-Z0-9), spaces, underscores, or dashes. When constructing your event names, it’s best to optimize for readability so the dashboard will be human-readable.
You can add any number of parameters to an event. To do so, simply chain the Add method to the TrackEvent call.
Add(string key, string value)There are multiple overloads for this method that accept the value as a different type including float, double, int, bool, Vector3, or TimeSpan. For any other types, use the ToString() method when possible. Key values follow the same rules as event names, must be non-empty strings between 1-64 characters, and must contain only alphanumeric characters (a-zA-Z0-9), spaces, underscores, or dashes. Again, optimize for readability.
Examples of usage:
StrivrAnalytics.TrackEvent("Sample Event").End();StrivrAnalytics.TrackEvent("Clicked Object")
.Add("Object Name", hit.transform.name)
.Add("Click Position", hit.point)
.Add("Click Duration", holdTime)
.Add("Experience Name", experienceName)
.End();Tracking Types
The Strivr SDK provides two different ways to track the user’s gaze.
Gaze Tracking (Primary, Generic)
The first method utilizes a Raycast that is fired outward from the center of the main camera on a timed interval. If the Raycast hits an object, an event is fired with the name of the hit object and the hit point coordinate as the parameters to this event. This first type of gaze tracking is automatically enabled when the application starts and it has a default time interval of 1 second.
You can enable/disable this tracking as well as change the time interval and Raycast distance via Tracking Settings.
Object Tracking (Secondary, Specific)
The second method enables tracking of specific objects. Simply add the StrivrObjectTracker script to the GameObject(s) you want to track. For each of the GameObjects with this script attached, an event will be fired when the object enters the user’s field of view.
StrivrObjectTracker utilizes a narrowed window that qualifies an object as actually being in a user’s field of view. Just because an object is being rendered in the user’s headset, it doesn’t necessarily mean that they are looking at that object. Take the following image for example:
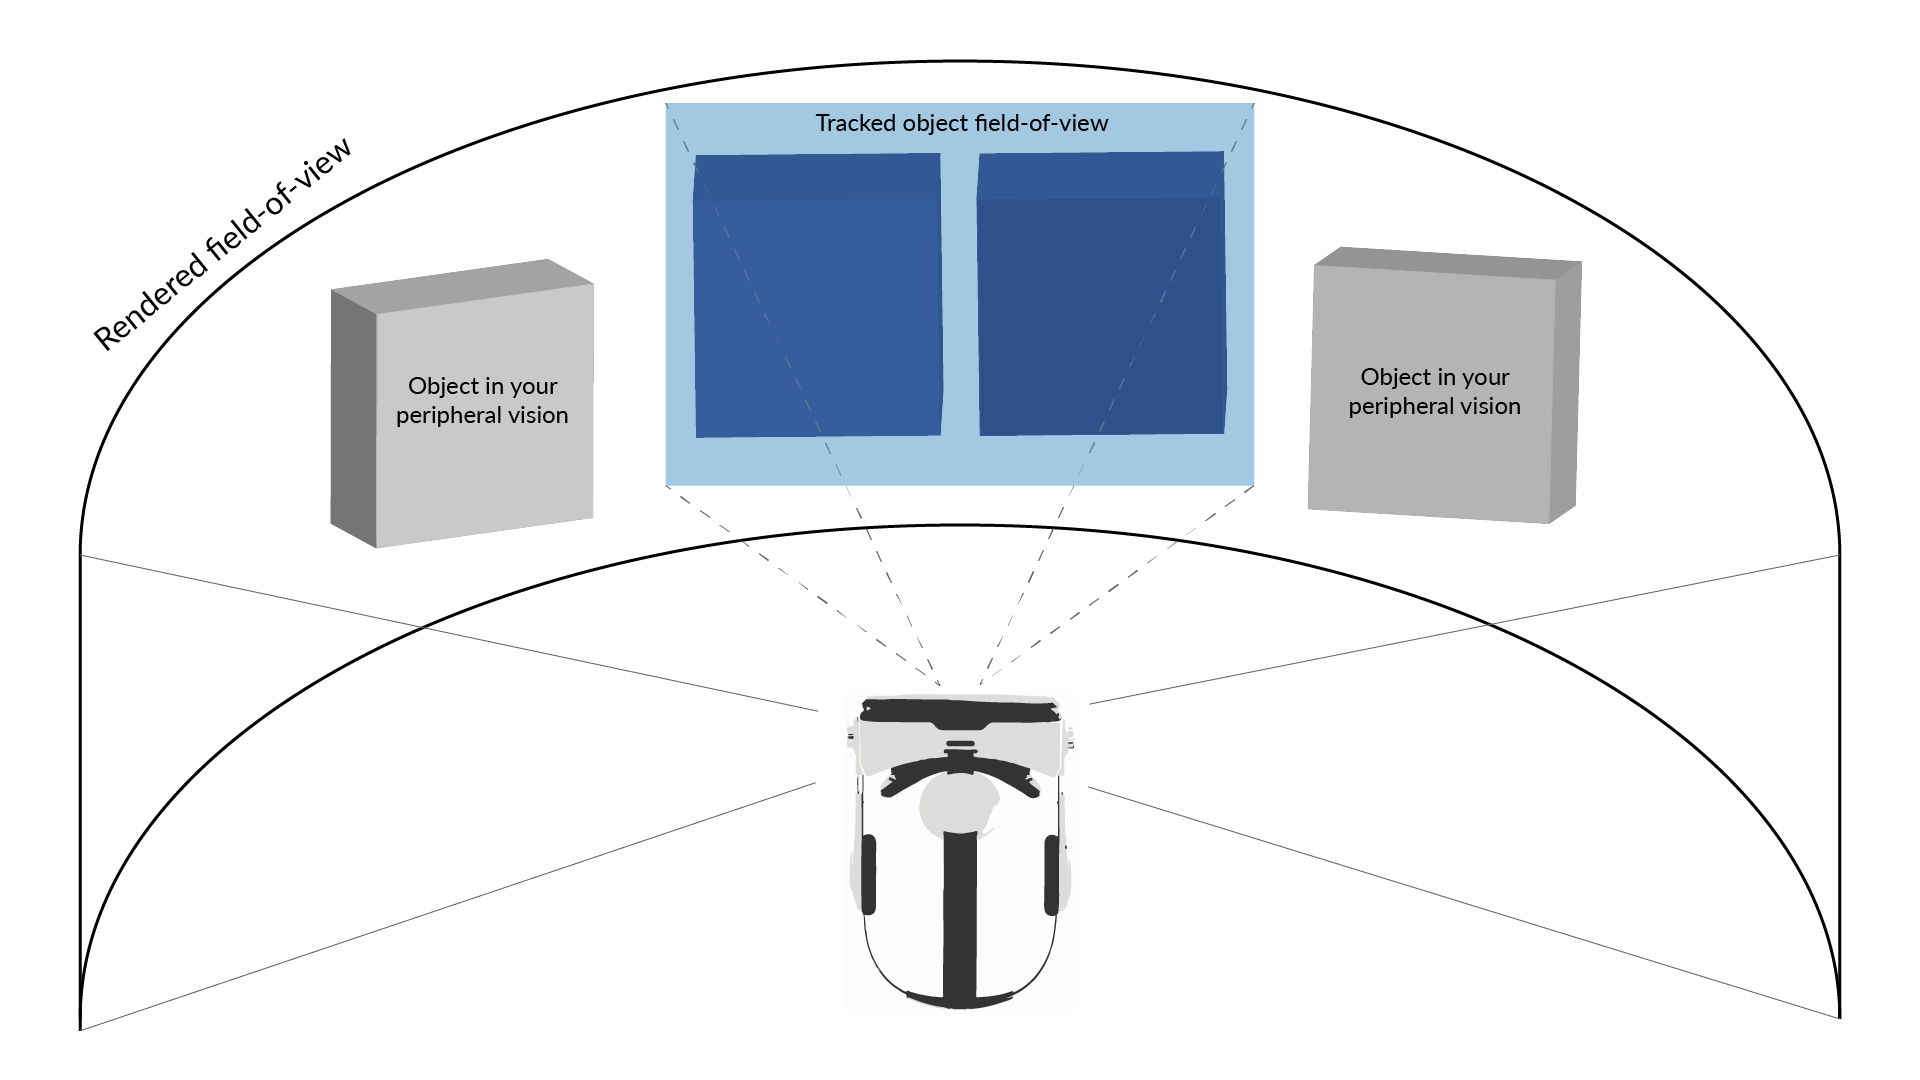
The light-blue window represents the window we use to determine whether the user is actually looking at an object. If an object falls outside of this window, it is most likely in the periphery and the user is probably not actually looking at that object. The gray squares are being rendered in the user’s headset; however, they are located in the user’s peripheral vision and therefore do not register an event that they are in the user’s field of view. On the other hand, the two dark blue squares do fall within the bounds of the tracking window and therefore do register as being in the user’s field of view. You can modify the size of the tracking window to make it bigger or smaller by changing the left, right, down, and up threshold settings.
The following image helps conceptualize what the numerical values of the thresholds mean. Picture the entirety of what’s being rendered in the headset as a 1 x 1 square; by moving the thresholds you can control the size of the inner tracked field of view window. Decimal values represent percent of the whole (e.g. a left threshold value of 0.4 means that the left side of the tracked window starts at the 40% mark of the field of view x-axis).
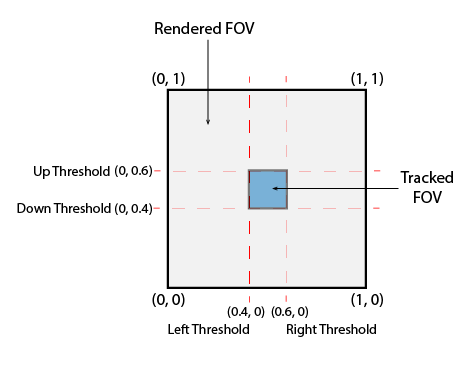
Left Threshold - [Default: 0.4]
Right Threshold - [Default: 0.6]
Down Threshold - [Default: 0.4]
Up Threshold - [Default: 0.6]
Max Distance - The maximum distance at which the object will register as being in the user’s field of view. [Default: 30]
Minimum FOV Threshold - The minimum time an object has to be in the use’s field of view to register an event, in seconds. [Default: 0.5]
FOV Debug - For debug purposes only. If this is enabled, objects in the user’s field of view will turn red and the console will print that you are looking at that object. Use this to determine whether to widen or narrow the tracked FOV area.
Tracking Settings
There are a number of settings you can change regarding event tracking. To access these settings, go to Strivr → Settings and then go to the Tracking Settings tab.
You will see the following window:
General Settings
| Setting | Description | Default value |
|---|---|---|
Test Mode |
If enabled: the app must be launched directly, trainee and device identity will be simulated, and data events will be printed to the console. This option should be disabled in production builds. NOTE: You must enable Test Mode throughout development for testing/debugging purposes and to log events to the Strivr Portal. When you are ready to export an APK for import to the Strivr Portal you must disable Test Mode. |
disabled |
Enable Pre-Build Check |
If enabled: Strivr will run a pre-build check to ensure that the StrivrSDK prefab is present and enabled in the first scene of your build only. |
enabled |